Red Wolf Wiki
PAGE CONTENTS
Polish Wiki

Welcome to the Primo Polish Machine Setup Guide. This self-paced guide is designed to help you efficiently set up and optimize your Primo Polish Machine, specifically for screen polishing applications. From understanding the machine's components to mastering polishing techniques, this guide provides you with the necessary information to enhance your screen polishing capabilities.
PAGE CONTENTS
Let’s Get Started
Please follow these steps before operating the machine:
-
Remove the foam packaging and bracing.
-
Remove the plastic film from the splash guards and the enclosure door.
-
Assemble the 6 Enclosure pieces (or 5 machine stand pieces) using the 12 (or 6) screws provided.
-
Insert the splash guards into the white fixture.
-
Make sure the thin white tray is placed on top of the fixture.
-
Apply the black Z-spring circle to the yellow bit, then apply the white foam to the black Z-spring.
-
Apply pieces of the black silicone adhesive strips and squares to the back of the device to be polished so that the device lays flat.
To prevent damage to the phone or injury to yourself:
-
Do not leave the machine unattended during use.
-
Be aware of potential pinch points at the front of the machine between the tray and the body of the machine.
-
Wear protective eyewear when operating the machine.
Complete Packing Checklist: Primo System & Starter Kit
The letters listed as bullet points correspond to the stickers that are affixed to each individual piece included in the packaging.
-
Polishing Machine Kit | 1x
-
Primo Polishing Machine | 1x
-
Power Converter | 1x
-
G - Power Cable | 1x
-
H - USB-B Male to USB-A Male Data Cable | 1x
-
I - Clear Acrylic Splash Guards | 2x
-
J - USB Type C Cable OTG | 1x
-
J - USB Micro B Cable OTG | 1x
-
Needle Tip Water Bottle | x1
-
Z-Finder | 2x
-
Brush Bottle 60ml | 1x
-
100 Use Kit
(letter is indicated
on each plastic bag):
-
Primo Polish Paste
-
Seal Spray
-
Tape
-
Polish Pads x2
-
Cleaning Cloth
-
K | Assembly Tools Kit | 1x
-
Red Handled Phillips Head Screwdriver | 1x
-
Large Chuck Wrench | 1x
-
Small Chuck Wrench | 1x
-
Allen Wrench Set | 1x
-
5mm Allen Wrench | 1x
-
4mm Allen Wrench | 1x
-
3mm Allen Wrench | 1x
-
2.5mm Allen Wrench | 1x
-
2mm Allen Wrench | 1x
Polish Machine

The Primo Polish Machine
Welcome to 'Setting Up Your Primo Polish Machine' program designed for screen polishing! This self-paced course is tailored to help you set up and optimize your Primo Polish Machine specifically for screen polishing applications. From understanding machine components to mastering polishing methods, you will gain valuable insights to elevate your screen polishing capabilities.

01
Dimentions & Weight
Our machine will take up no more space than a printer in your business. The Primo Polish Machine is 17" wide x 15" deep x 12" tall (43.18cm x 38.1cm x 30.48cm). With a total weight of 21 lbs (9.5kg).


03
Polish Time
Polish length depends on a few factors. What device you are polishing, and the polish head size. On average Apple Watches take about 2 minutes to polish and phones take 5 - 15 minutes.
Unbox & Set Up the Primo Polish Machine
Join us in this video as we demonstrate the unpacking of your Primo Polish Machine. We'll highlight each item that comes with your purchase and provide insights on the best ways to handle and set them up for a successful installation.
Online App
Getting Started with the Primo Polish App
This section will guide you through the essential steps to get started with the Primo Polish app. You'll learn how to download the app on your device, create a new account, and log in for the first time. These steps will ensure you have access to all the features and functionalities needed to manage your polishing tasks effectively and efficiently.
Downloading the Primo Polish App
To get started with your Primo Polish Machine, you'll need to download the Primo Polish app. You can find it on both the iOS App Store and Google Play Store. Follow the instructions in this video to download and install the app on your device.
Creating an Account
Creating an account is simple. Open the app and click on "Create Account." Enter your details, including your email address, a secure password, an Organization Code and any other required information. You will need to verify your email after you create an account. Make sure to check spam if you don't see the email come through. Watch the video for a detailed walkthrough. Need an Org code? Reach out to your Distributor or us at support@redwolf.io


Logging In
After creating your account, logging in is quick and easy. Enter your email and password, and you'll be taken to the main interface of the app.

Connecting a Machine
Connecting the Primo Polish Machine:
-
Download and Open the Primo Polish App:
-
Ensure you have the Primo Polish app installed on your Android or Apple device.
-
Open the app and ensure that Bluetooth is enabled on your device if you plan to connect via Bluetooth.
-
-
Choose Your Connection Method:
-
Wired Connection:
-
Use the included cable to connect your device to the Primo Polish machine.
-
Make sure the machine is powered on.
-
Bluetooth Connection:
-
Ensure your Primo Polish machine is within Bluetooth range.Make sure the machine’s Bluetooth is turned on.
-
-
Search for the Machine:
-
In the Primo Polish app, tap on the "Search for Machine" button.
-
A list of available machines will appear.
-
-
Select the Machine:
-
Look for your machine in the list. A symbol to the left of the machine name will indicate whether it is available via Bluetooth or a wired connection.
-
A Bluetooth symbol indicates a Bluetooth connection.
-
A Cable symbol indicates a wired connection.
-
-
Connect to the Machine:
-
Look for the machine name in the list.
-
Then, click the "Connect" button to establish a connection.
-
Follow any on-screen instructions to complete the pairing process.
-
Connecting the Primo Polish 2 Machine: Andriod Only
-
Download and Open the Primo Polish App:
-
Ensure you have the Primo Polish app installed on your Android device.
-
Open the app.
-
-
Connect via Wired Connection:
-
Use the included cable to connect your Android device to the Primo Polish 2 machine.
-
Make sure the machine is powered on.
-
-
Search for the Machine:
-
In the Primo Polish app, tap on the "Search for Machine" button.
-
The Primo Polish 2 machine should appear in the list.
-
-
Select the Machine:
-
Locate your Primo Polish 2 machine in the list. The machine will display a Cable symbol to indicate a wired connection.
-
-
Connect to the Machine:
-
Look for the machine name in the list.
-
Then, click the "Connect" button to establish a connection.
-
Follow any on-screen instructions to complete the process.
-

Machine Demo
Primo Polish Machine Demo
Ready to polish your first screen? In this video, we'll guide you through selecting the right settings, preparing your machine and device, and starting your first polish. We'll also share tips to ensure your first polish is a success.
Phone Polish Walkthrough and Demo
Are you prepared to polish your screen for the first time? This guide will take you through each step, from documenting screen damage to finishing the repair. We will offer a detailed manual on choosing your preferences to help you adjust your settings for the best results. By the end of this section, you will have a screen that shines beautifully.
Apple Watch Polish Walkthrough and Demo
This guide will take you through each step, from documenting screen damage to finishing the repair for an Apple Watch.
Primo Polish 2
Primo Polish 2
The Primo Polish 2 brings a new level of precision and efficiency to polishing with innovative features like Gravity-Z Technology, which uses gravity for flawless pressure application, and an intuitive, automatic Z calibration system that eliminates manual adjustments. With a streamlined design including a universal phone mount the Primo Polish 2 offers faster setup, reduced polish times, and consistent results across all devices. This upgraded version is designed to revolutionize your polishing experience, making it easier, better, and faster than ever before. If you don't have the Primo Polish 2 upgrade kit, please reach out to support@redwolf.io to get one for your machine.
Primo Polish 2 Set Up and How To
Primo Polish 2 Full Walkthrough: Effortlessly Remove Scratch
Consumables
Consumables
The right consumables are essential for achieving the best polishing results with your Primo Polish machine. In this section, you'll discover the variety of high-quality consumables available, designed to support every step of the polishing process. From specialized polishes and protective sprays to cleaning cloths and polishing pads, each item plays a crucial role in delivering a flawless, professional finish every time.
100 Use Kit
The 100 Use Kit is designed to provide all the essential consumables needed for up to 100 polishing sessions with your Primo Polish machine. Each kit includes carefully selected items to ensure a consistent and high-quality polishing process every time.
What's Included in the 100 Use Kit:
-
300ml Polish: A specialized formula designed to effectively remove scratches and restore the smooth, clear surface of your devices. This polish is safe for glass surfaces and provides a professional finish.
-
Tape: Used to protect areas of the device that do not require polishing, such as ports, buttons, and other sensitive components. The tape helps ensure a precise polishing process.
-
Microfiber Cloth: A soft, high-quality cloth designed to clean surfaces before and after polishing. It is non-abrasive and helps to remove dust, dirt, and residue without scratching the surface.
-
2 Polish Pads: Two reusable polish pads are provided for applying the polish. These pads are made of a specialized material that works effectively with the polish to remove scratches and imperfections.
-
Pre-Treat Solution: This solution is used to remove the oleophobic coating from the device's surface before polishing. Removing this coating ensures that the polish adheres properly, allowing for a more effective polishing process.
-
Seal Spray (Oleophobic Spray): The Seal Spray is applied after polishing to restore the device's oleophobic coating. This coating helps to repel fingerprints and smudges, maintaining the surface's smooth feel and clarity.
Using the 100 Use Kit:
Each component in the 100 Use Kit is designed to work together, providing a seamless polishing experience. Follow the instructions provided with each item to ensure the best results and extend the lifespan of your devices.
Maintenance
Maintenance (Coming Soon)
Regular maintenance will keep your Primo Polish Machine in top condition. These video covers essential maintenance tasks, including cleaning and routine checks, to ensure your machine continues to perform optimally.
Troubleshooting
Troubleshooting
Encountering a problem? This section provides solutions to common issues you might face while using the Primo Polish Machine. From polishing errors to connectivity issues, we'll help you troubleshoot and resolve these problems quickly. If you need further assistance, our customer support team is always here to help.
Y-Drive - Brass Coupler Troubleshooting
Y-Drive - Brass Coupler Troubleshooting
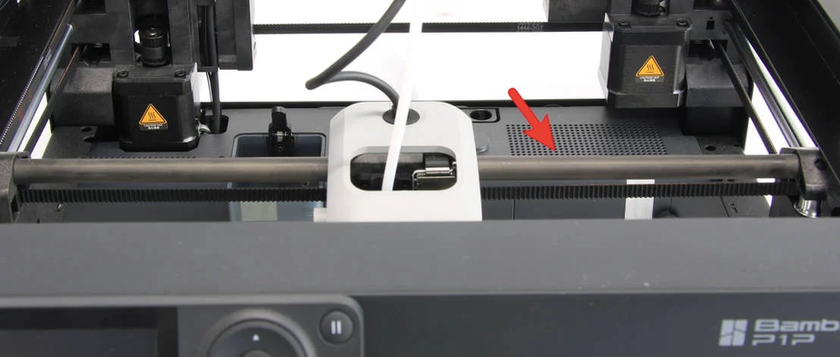
This video guides you through troubleshooting the brass coupler in your machine's Y-Drive. The brass coupler connects the Y-Drive motor to the lead screw, which moves the polishing bed along the Y-axis. Over time, the coupler may become loose, misaligned, or show signs of wear, affecting the machine's performance.
Key Steps Covered in the Video:
-
Inspecting the Brass Coupler:
-
Learn how to visually inspect the coupler for any signs of damage or wear, such as cracks or deformation.
-
Check for any unusual movement or looseness that could indicate a problem.
-
-
Re-aligning the Coupler:
-
Follow the steps to correctly align the coupler if it has shifted or become misaligned. Proper alignment ensures smooth movement of the polishing head along the Y-axis.
-
-
Testing the Machine:
-
After adjustments, see how to run a test to ensure that the Y-Drive is functioning correctly and that the brass coupler is properly secured and aligned.
-
Why This Matters:
Maintaining the brass coupler is essential for the smooth operation of your machine. Regular checks and adjustments help prevent mechanical issues and ensure consistent polishing quality.
Step-by-step Instructions:
(1) Turn Off the Machine:
-
Ensure the machine is powered off.
-
Remove the power and data cables (optional but recommended).
(2) Disconnect the Stepper Motor:
-
Disconnect the stepper motor to allow manual adjustments.
(3) Manually Move the Spindle Assembly:
-
Step 1: Rotate the X-drive screw to manually move the spindle assembly towards the left end (the blue mount holding the gravity Z assembly).
-
Tip: This process can be greasy, so it’s recommended to wear gloves or rotate the blue shaft coupling attached to the right end.
-
Step 2: Continue rotating until the spindle assembly is approximately 1 cm from the sensor on the left end. Be careful not to damage the sensor.
(4) Remove the Stepper Motor:
-
Step 1: Use a 2.5mm Allen key (included in the kit) to remove the 4 hex screws on the inner right side of the machine that hold the stepper motor in place (image and videos in the link).
-
Tip: If needed, reorient the machine by resting it on its right side, propped up by the stepper motor.
-
Step 2: To loosen tough screws, insert the short side of the Allen key into the hex screw, then use the leverage of the long side to turn it. A quarter or half turn should loosen it enough. For inner screws, make smaller turns due to limited space.
(5) Shift the X-Driveshaft:
-
Shift the now-loose X-driveshaft to the right to remove it from the left bearing.
(6) Unscrew the Brass Coupling:
-
Rotate the driveshaft to unscrew the brass coupling from it while keeping the spring in place.
-
Continue turning the driveshaft to shift the spindle assembly until you reach the open end of the driveshaft. Ensure there’s enough space inside to insert the brass coupling but do not completely remove the driveshaft.
(7) Reassemble the Spindle Assembly:
-
Insert the brass coupling into the spindle assembly and screw both back onto the driveshaft, keeping the brass coupling in place, until the assembly is 2-3 cm from the end.
(8) Remount the Driveshaft:
-
Place the driveshaft back into the bearing slot on the left side.
(9) Reattach the Stepper Motor:
-
Reinstall the stepper motor by screwing it back into place.
-
Reconnect the Stepper motor cable