Red Wolf Wiki
PAGE CONTENTS
Print3D Wiki

Welcome to the Red Wolf Technology Learning Management System. In this series, we will guide you through every step of using your new Primo Print3D machine to create custom phone cases. Whether you're unboxing your machine for the first time or troubleshooting common issues, our detailed videos and text explanations will ensure you get the most out of your Primo Print3D experience.
PAGE CONTENTS
Print3D Machine

The Primo Print3D Machine
In this section, you'll get acquainted with your new Primo Print3D Machine. We'll start with the unboxing process, showing you all the components included in the package and providing tips for a smooth setup. Then, we'll guide you through setting up the machine, including connecting it to power and Wi-Fi, and performing the initial calibration. By the end of this section, your Primo Print3D Machine will be ready for its first print.
Unboxing the Primo Print3D Machine
In this video, we'll walk you through the unboxing process of your Primo Print3D Machine. We'll show you all the components included in the package and provide tips on how to handle and organize them for an efficient setup.
Calibration
How to Calibrate the Primo Print3D Printer
Calibrating your 3D printer ensures that your prints come out accurately, with the correct dimensions and optimal quality. Follow these steps to calibrate the 3D printer effectively:
1. Prepare for Calibration
-
Clean the Print Bed: Start by cleaning the print bed to remove any dust, oils, or remnants from previous prints. Use isopropyl alcohol and a lint-free cloth to wipe it down.
-
Check the Nozzle: Ensure the nozzle is clean and free of debris. If necessary, use a brass brush to clean the nozzle gently while it's warm.
-
Check the Filament: Make sure the filament is loaded correctly and that there are no clogs or jams in the extruder.
2. Turn on the Printer
-
Power on the Primo Print3D printer by pressing the power button located at the back of the machine.
3. Access Calibration Settings
-
On the printer's screen, navigate to the Settings menu.
-
Select Calibration from the options.
4. Level the Print Bed
-
Choose the Auto Bed Leveling (ABL) option. The printer will begin the automatic bed leveling process, which involves moving the print head to different points on the bed to measure its height.
-
Allow the printer to complete the leveling process. It will make small adjustments to the bed and record the data.
5. Perform Nozzle Offset Calibration
-
Select Nozzle Offset Calibration in the calibration menu. This process ensures the correct distance between the nozzle and the print bed.
-
Follow the on-screen instructions to start the calibration. The printer will print a test pattern to help determine the correct offset.
-
Once the pattern is printed, check if the filament lines are consistent and adhere properly to the bed. If not, use the on-screen controls to adjust the Z-offset until the lines are smooth and consistent.
6. Save and Exit
-
Once all calibrations are complete, save the settings in the printer's menu.
-
Restart the printer to ensure all calibration settings are applied correctly.
7. Test Print
-
Perform a test print in your Print3D App. Go to Other -> Testing -> select and print the "benchy", to confirm that the printer is well-calibrated.
-
Check for consistent layer adhesion, dimensional accuracy, and surface quality. Make any fine adjustments as needed.
By following these steps, you will ensure that your Primo Print3D is properly calibrated, resulting in better print quality and accuracy. Regular calibration is recommended, especially when switching between different filaments or after moving the printer.
Would you like any additional details on this process?
Online App

Online App
In this section, you'll get acquainted with your new Primo Print3D Machine. We'll start with the unboxing process, showing you all the components included in the package and providing tips for a smooth setup. Then, we'll guide you through setting up the machine, including connecting it to power and Wi-Fi, and performing the initial calibration. By the end of this section, your Primo Print3D Machine will be ready for its first print.
Downloading, creating an Account & Logging In
Creating an account is simple. Open the app and click on "Create Account." Enter your details, including your email address, a secure password, an Organization Code and any other required information. You will need to verify your email after you create an account. Make sure to check spam if you don't see the email come through. Watch the video for a detailed walkthrough. Need an Org code? Reach out to your Distributor or us at support@redwolf.io After creating your account, logging in is quick and easy. Enter your email and password, and you'll be taken to the main interface of the app. The video will provide an overview of the app's features and how to navigate them.
Exploring The App
Exploring The App
Dive deeper into the Primo Print3D app with this section. We'll cover a variety of features to help you maximize your 3D printing experience. Learn how to connect your machine, understand the job queue, and explore the different types of phone cases you can create. We'll also guide you through updating your filament inventory, adding tokens, and utilizing accessory and tool prints. Additionally, discover other print options and how to enable Customer Mode, allowing customers to design their own cases and add them to the print queue.
Connecting a Machine
To connect your Primo Print3D Machine to the app, you'll need to enter the printer's name, IP address, access code, and serial number. This video will guide you through each step to ensure a successful connection.
Understanding the Job Queue
The job queue is connected to the printer, not the user. When you create prints, they are stored on the printer's queue. This section will explain how to manage your print jobs effectively.
Types of Cases
Explore the different types of phone cases you can create using the Primo Print3D Machine. We'll cover various designs and customization options available in the app.
Updating Filament Inventory
Keeping your filament inventory up-to-date is crucial for smooth operation. This video will show you how to update your filament inventory within the app.
Adding Tokens
Tokens are used for purchasing materials or designs. Learn how to add tokens to your account with this step-by-step guide.
Accessories
Discover the additional accessories available for you to print and how they can enhance your store offerings.
Tools
Get to know the various tools available within the app to assist your stores with repairs.
Other Prints
Customer Mode
Customer Mode allows customers to build their own phone cases and add them to the store/user queue without being able to print. This video explains how to enable and use Customer Mode to enhance your customer experience.
First Print
First Print
Ready to make your first custom phone case? In this video, we'll guide you through selecting a design, preparing your machine, and starting your first print. We'll also share tips to ensure your first print is a success.
First Print - Choosing Your Options
Ready to bring your first custom phone case to life? This section will guide you through the entire process, from selecting your design to starting the print. We'll also introduce a detailed guide on choosing your options, helping you customize your print settings for the best possible outcome. By the end of this section, you'll have a beautifully printed phone case ready to use or share.
Filament and Materials
Filament and Materials
Choosing the right filament is crucial for the quality of your prints. This section covers the types of filaments compatible with the Primo Print3D Machine, how to load and change them, and tips for selecting the right materials for different types of phone cases.
Filament and Material Options
Choosing the right filament is crucial for the quality of your prints. This section covers the types of filaments compatible with the Primo Print3D Machine, how to load and change them, and tips for selecting the right materials for different types of phone cases.
Maintenance
Maintenance
Regular maintenance will keep your Primo Print3D Machine in top condition. These video covers essential maintenance tasks, including cleaning and routine checks, to ensure your machine continues to perform optimally.
X-axis Carbon Rods
While the Carbon rods used on the X-axis don't require lubrication or maintenance, it's still recommended to clean them out periodically for dust and buildup.

When to do it?
The x-axis carbon rods should be checked once a month for any dust and particle buildup.
How to do it?
The X-axis Carbon Rods can be cleaned with isopropyl alcohol and a dust-free cloth. Spray a bit of isopropyl alcohol on the fabric and gently rub the carbon rods to remove any debris.
Z-axis Lead Screws
Three Z-axis lead screws require regular greasing. They are used for moving the heated bed on the Z axis, and proper greasing will ensure smooth operation.
When to do it?
The z-axis lead screws should be checked and greased every three months.
How to do it?
Before greasing the z-axis lead screws, the first step before would be to clean them of any dust or plastic particles.
The next step is to use lubricating grease and apply a thin coat over the lead screws. With the bed home, apply a thin coat of lubricating grease, then move the bed to a lower position.
Apply another thin coat of grease on the z-axis lead screws and home the printer again.
You can repeat the movement process a few times to ensure the grease is evenly spread over the z-axis lead screws. When complete, clean out any excess grease that builds up close to the lead screw nuts.
You can use the BX-300/F series grease, but other lubrication alternatives can be used. A popular lubricant is Super Lube 92003 Silicone Lubricating Grease with PTFE or Lucas Oil 10533 White Lithium Grease which should work similarly.

Y-axis and Z-axis Linear Rods and Bearings
To ensure smooth movement, the P1P uses LMU8 bearings and 8mm linear rods to ensure smooth movement. The bearings are greased from the factory, in order to prevent rust and prolong the service life, regular cleaning, and anti-rust maintenance are recommended for linear rods.

When to do it?
Y-axis and Z-axis linear rods should be checked once a month for any dust and particle buildup. If volatile filaments such as ABS\ASA are used, it is recommended to clean the rods every 5 rolls.
Y-axis and Z-axis rods should be anti-rust every three months.
How to do it?
Y-axis and Z-axis linear rods can be cleaned with isopropyl alcohol and a dust-free cloth. Spray a bit of isopropyl alcohol on the cloth and gently rub the rods to remove any debris.
Please note that if you clean the rods with IPA, you need to add a uniform thin coat of oil/grease on the rods, to prevent rust. Besides that, ensure that IPA does not reach the bearings of the X and Y axis.
If the bearing has abnormal ball noise due to insufficient internal lubrication, you can also try to apply some grease on the bearing and slide the bearing several times to make the grease soak into the bearing to reduce the abnormal noise. This operation may be difficult to implement, but the abnormal sound will not affect the printing performance in theory, so it can be ignored.
You can refer to using Super Lube 52004 Synthetic Lightweight Oil for better performance.
Extruder Assembly
The P1P Extruder assembly can get filament dust and debris inside after using the printer for a long time. Some filaments generate more dust than others, so your mileage might vary.

When to do it?
You should clean the dust inside the extruder when you can see small amounts of dust on the yellow gear.
How to do it?
The fastest way to clean it and ensure the extruder is free from debris or filament dust is to use a can of compressed air and blow air over the yellow gear.
You can also remove the hotend and blow some compressed air underneath the extruder. This should clean most of the filament dust inside.
Filament Cutter
The filament cutter used in the extruder cuts the filament regularly, during filament swaps. The blade of the cutter can get dull after a few rolls of filament are printed so it should be checked regularly to ensure that the blade is still sharp.

When to do it?
For regular filaments like PLA/PETG/ABS/PC, the blade should be checked every 3-5 rolls. If the blade is dull, replace it.
For abrasive filaments like PA+CF/PA+GF, the cutter blade can get dull much quicker, so we recommend checking it after printing 1-2 rolls of abrasive materials. If the blade is dull, replace it.
How to do it?
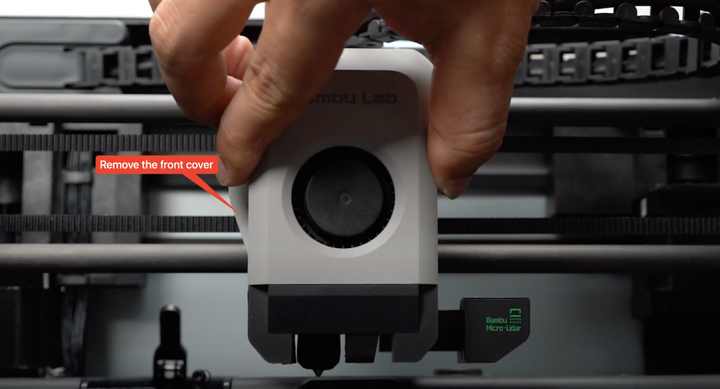
1. Remove the extruder cover
Please remove the front cover of the extruder (Front Housing Assembly).
2. Unscrew the lever
Carefully loosen the screw from the lever, as shown in the image below. This will allow the lever to open up further and will grant you access to the Filament Cutter.
When unscrewing the filament cutter retention screw, you should keep the Filament Cutter pressed.
This ensures you can remove the screw completely, to avoid damaging the plastic section of the extruder.

Ensure that you are using the flat end of the hex tool to avoid damaging the filament cutter screw.
If the screw is damaged, you might need to replace the filament cutter lever which contains a replacement screw.
3. Remove the old Filament Cutter
With the lever loosened, we are able to access the Filament Cutter and remove it.

4. Install the new Filament Cutter
Installing a new Filament Cutter is easy, and it's done by aligning the small blade tabs in the lever, then inserting it into the extruder.

5. Tighten the lever screw
Finally, tighten the lever screw, to ensure it is stopping at the correct location as below.

6. Attach the front cover
With the Filament Cutter replaced, simply ensure that the wiring is correctly managed, and put the Front Housing Assembly back on the extruder.
Hotend Silicone Sock
The silicone sock around the hotend helps maintain a consistent temperature while also protecting the hotend from plastic buildup during printing.

When to do it?
The silicone sock should be replaced if wear signs are present on it, or if the silicone sock doesn't remain attached securely to the hotend.
How to do it?
Simply remove the old silicone sock from the hotend, and install a new one.
Idler Pulley
There are multiple idler pulleys installed on the printer. These idlers have sealed bearings inside which don't require greasing, but we still recommend adding a bit of lubricating oil between the idler flange and the plastic holder to avoid any squeaking noises. DO NOT add grease to the belts as this might generate a belt slip or a layer shift.

When to do it?
When squeaking noises are present during printing, or during the XY axis movement.
How to do it?
A small amount of lubricating oil should be applied on top and on the bottom of the idler, in the location between the idler flange and the plastic holder, if needed. Avoid adding lubrication oil to the idlers if no squeaking noises are present, to avoid any dust buildup.
You can refer to using Super Lube 52004 Synthetic Lightweight Oil for better performance.
Chamber Camera (Optional)
The chamber camera lens should be cleaned regularly, to ensure a clear view.

When to do it?
We recommend cleaning the camera lens when the video is blurred or visibly dirty. If printing ABS, we recommend cleaning it every week.
How to do it?
Using a microfiber cloth and some isopropyl alcohol, gently rub the chamber camera. A q-tip can also be used as it allows the user to reach the camera easier.
Part cooling fans
There are three fans that should be regularly checked for any dust and debris build-up. The hotend fan, front cover fan and the auxiliary fan. They should be regularly checked for debris or dust buildup to ensure a smooth operation and long life.

When to do it?
We recommend checking the fans every week to clean any debris or dust that might have built up around the blades.
How to do it?
With the printer off, we recommend using a can of compressed air. While keeping the fan blades in place, use the compressed air to blow air over the blades and clean any dust or debris.
Nozzle wiper
The nozzle wiper is an important part that needs to be checked from time to time, to ensure it is undamaged, and the cleaning process works well.

When to do it?
The nozzle wiper needs to be checked before starting any print, to ensure it is free of any filament debris and the PTFE side is not damaged. The wiper should also stay in a horizontal position for proper operation
How to do it?
If the nozzle wiper is damaged, we recommend replacing it with a spare.
PTFE Tube
The P1P uses different PTFE tubes for guiding the filament from the AMS to the extruder. PTFE tube is quite resilient but there are some cases where it needs to be replaced.
When to do it?
The PTFE tube should be replaced when clear signs of wear are shown on it. Most of the time, the inside of the PTFE tube can wear out quickly when printing abrasive filaments, so we recommend checking after printing about 5 rolls of abrasive materials.
When printing regular filaments, we recommend checking the tubes after about 10 rolls of material.
How to do it?
Replacing the PTFE tube can be a quick task, or a longer one, depending on what section of PTFE tube needs to be replaced.
Troubleshooting
Troubleshooting
Encountering a problem? This section provides solutions to common issues you might face while using the Primo Print3D Machine. From print errors to connectivity issues, we'll help you troubleshoot and resolve these problems quickly. If you need further assistance, our customer support team is always here to help.
Bed Adhesion
Prints Not Sticking to Bed
If your 3D print isn't sticking to the bed, there could be several reasons for this issue. Here are some common causes and solutions:
-
Bed Leveling Issues
-
Problem: The bed may not be perfectly level or calibrated, causing inconsistent first-layer adhesion.
-
Solution: Recalibrate or re-level the bed according to your printer’s manual. Make sure the distance between the nozzle and bed is consistent across the entire surface.
-
-
Dirty or Contaminated Bed
-
Problem: Dust, oils, or leftover filament can prevent proper adhesion.
-
Solution: Clean the bed with isopropyl alcohol or another appropriate cleaner to remove contaminants. For some surfaces, a specialized bed adhesive may also be helpful. See down below for more information regarding bed cleaning.
-
-
Incorrect Bed Temperature
-
Problem: The bed may not be at the optimal temperature for the filament you’re using.
-
Solution: Check the recommended bed temperature for your filament and adjust the printer’s settings accordingly.
-
-
Nozzle Height Issues
-
Problem: The nozzle may be too far from the bed, preventing the filament from sticking properly.
-
Solution: Adjust the nozzle height so that it is at the correct distance from the bed. Typically, the nozzle should be close enough to lightly squish the first layer of filament against the bed.
-
-
Filament Quality or Type
-
Problem: Low-quality filament or using a filament that is not well-suited for your bed surface can cause adhesion problems.
-
Solution: Use high-quality filament and ensure it's appropriate for your printer and bed surface. Some materials might require different bed surfaces or adhesives.
-
-
Bed Surface Material
-
Problem: The type of bed surface you are using may not be optimal for the filament.
-
Solution: Consider using different bed surfaces or adhesives designed for specific filaments. For example, PEI sheets or glass plates might improve adhesion for certain materials.
-
-
Inadequate First Layer Settings
-
Problem: Incorrect settings for the first layer, such as speed or extrusion rate, can affect adhesion.
-
Solution: Adjust the first layer settings in your slicer software. Slowing down the first layer speed and increasing the extrusion width can help.
-
-
Environmental Factors
-
Problem: Drafts, temperature fluctuations, or humidity can affect adhesion.
-
Solution: Ensure the printing environment is stable and free from drafts. Consider enclosing your printer if environmental factors are a concern.
-
Bed Adhesion Aids
-
Importance: Some filaments benefit from additional adhesion aids like glue sticks, painter's tape, or specific bed adhesives.
-
Troubleshooting:
-
Check Adhesion Aids: Ensure that any adhesion aids used are applied correctly and are in good condition. Replace or reapply as needed.
By addressing these potential issues, you should be able to improve the adhesion of your prints and reduce the likelihood of them not sticking to the bed.
Cleaning the Bed
Cleaning the bed of your 3D printer is crucial for several reasons:
-
Improved Adhesion: A clean bed ensures that the first layer of your print adheres properly. Contaminants like dust, oils, or leftover material can interfere with adhesion, leading to print failures or poor-quality prints.
-
Better Print Quality: A clean bed helps maintain a consistent distance between the nozzle and the print surface. This consistency is vital for achieving accurate layer heights and preventing issues like warping or layer separation.
-
Longer Bed Life: Regular cleaning can help prevent the buildup of materials that might cause damage over time. For example, leftover filament or adhesive can harden and become difficult to remove, potentially affecting the bed's surface.
-
Prevention of Print Failures: Residue or debris on the bed can lead to issues like incomplete prints, poor adhesion, or even nozzle clogs if the debris gets carried into the nozzle.
-
Maintaining Print Accuracy: A clean bed helps ensure that the print starts from a level and clean surface, which is essential for achieving accurate and consistent results.
To clean the bed, you typically want to use a gentle cleaning solution appropriate for the bed material (like isopropyl alcohol for glass or specific cleaning agents for other types of surfaces - Dawn dish soap works well) and a soft cloth or sponge. Avoid abrasive materials that could scratch or damage the bed.
The frequency with which you should clean the bed of your 3D printer depends on several factors, including the type of prints you're making, the material you're using, and how often you print. Here are some general guidelines:
-
After Every Print: For best results, it's a good practice to give the bed a quick wipe-down with isopropyl alcohol or another appropriate cleaner after each print, especially if you're working with materials like PLA that can leave residue.
-
Regular Maintenance: If you're printing frequently, a more thorough cleaning every few prints or once a week might be beneficial to remove any buildup or residue that might accumulate over time.
-
When Switching Materials: If you're changing the type of filament or material, it's a good idea to clean the bed to ensure that any residues from the previous material don’t affect adhesion.
-
When Experiencing Print Issues: If you notice issues with print adhesion, such as warping or incomplete prints, it could be a sign that the bed needs cleaning.
-
Before Major Prints: For larger or more critical prints, cleaning the bed just before starting can help ensure the best possible adhesion and print quality.
In general, keeping the bed clean helps maintain consistent print quality and prolong the lifespan of the bed surface. If you’re unsure how often to clean, monitoring the performance of your prints and the condition of the bed will give you a good indication.
Nozzle Clog
Nozzle clogs on your 3D printer can be caused by various factors. Here’s a rundown of common reasons and their solutions:
-
Filament Issues
-
Problem: Poor-quality filament, moisture absorption, or incorrect filament diameter can cause clogs.
-
Solution: Use high-quality filament, store it properly in a dry place, and ensure the filament diameter matches your printer’s specifications. Drying filament with a filament dryer can also help if it has absorbed moisture.
-
-
Incorrect Temperature Settings
-
Problem: Printing at a temperature that’s too low can cause the filament to not melt properly, leading to a clog.
-
Solution: Check the recommended printing temperature for your filament and ensure your printer’s hotend is set to the correct temperature.
-
-
Hotend Issues
-
Problem: Build-up of filament or degraded components in the hotend can block the flow.
-
Solution: Regularly clean the hotend and check for any blockages. If the hotend components are worn out or damaged, consider replacing them.
-
-
Nozzle Blockage
-
Problem: Debris, burnt filament, or a partial blockage in the nozzle can obstruct filament flow.
-
Solution: Remove the nozzle and clean it using a needle or nozzle cleaning tool. For stubborn blockages, consider using a cold pull technique or replacing the nozzle.
-
-
Improper Cooling
-
Problem: Insufficient cooling can cause filament to overheat and clog the nozzle.
-
Solution: Ensure that the cooling fan and heat sinks are functioning correctly. Proper cooling helps maintain the right temperature for smooth extrusion.
-
-
Filament Path Obstructions
-
Problem: Kinks or blockages in the filament path can restrict the flow of filament to the nozzle.
-
Solution: Check the filament path from the spool to the hotend. Make sure there are no obstructions or sharp bends in the filament route.
-
-
Extruder Problems
-
Problem: Issues with the extruder, such as a malfunctioning drive gear or stepper motor, can lead to insufficient filament feed.
-
Solution: Inspect the extruder for any mechanical issues and ensure it’s feeding the filament correctly. Adjust the extruder settings if needed.
-
-
Incorrect Retraction Settings
-
Problem: Excessive retraction can cause the filament to pull back too far, potentially leading to clogs.
-
Solution: Adjust retraction settings in your slicer software. Test different values to find a balance that prevents clogs but still works effectively.
-
-
Temperature Fluctuations
-
Problem: Rapid temperature changes can affect filament flow and cause clogs.
-
Solution: Ensure that your printer’s temperature remains stable throughout the print. Check for any issues with the temperature sensor or heating element.
-
If you encounter a nozzle clog, start by diagnosing the issue based on these factors. Cleaning the nozzle and ensuring all components are functioning correctly will often resolve the problem.
Loading Filament in the AMS
If you're having trouble loading filament into your 3D printer, there are several potential issues to check and troubleshoot. Here’s a step-by-step guide to help you resolve common filament loading problems:
1. Check the Filament Spool
-
Ensure Proper Placement: Make sure the filament spool is correctly placed on the spool holder and can freely unwind.
-
Check Filament Quality: Verify that the filament is not tangled or brittle. Old or damaged filament can cause feeding issues.
2. Inspect the Filament Path
-
Clean the Path: Ensure that the path from the spool to the extruder is clear of any obstructions or tangles.
-
Check for Kinks: Look for any kinks or bends in the filament that could be causing a blockage.
3. Examine the Extruder Mechanism
-
Check the Gear and Idler: Make sure the extruder gears and idler are clean and functioning correctly. Look for any debris or filament residue that might affect their operation.
-
Test Extruder Movement: Manually move the extruder to ensure it moves smoothly and that the gears are properly engaging the filament.
4. Verify the Hotend
-
Check for Blockages: Ensure that the hotend and nozzle are not clogged. A blockage in the nozzle can prevent filament from extruding.
-
Preheat the Hotend: Preheat the hotend to the appropriate temperature for the filament you’re using. This can help if the filament is not feeding properly due to a cold or clogged nozzle.
5. Check the Filament Loading Procedure
-
Follow the Manual: Make sure you’re following the correct loading procedure as specified in the Bambu Labs PS1 manual. Different printers have different methods for loading filament.
-
Use the Printer’s Interface: If your printer has an LCD screen or touchscreen, use the provided controls to load the filament. Many printers have a specific “Load Filament” option.
6. Inspect the Bowden Tube
-
Check Tube Connections: Ensure that the Bowden tube (if applicable) is properly connected at both ends and is not damaged or clogged.
-
Clean or Replace: If the Bowden tube is dirty or obstructed, clean or replace it as needed.
7. Check for Proper Temperature Settings
-
Verify Temperature: Ensure that the hotend is set to the correct temperature for the type of filament you are using. Filament won’t load correctly if the hotend isn’t hot enough.
8. Inspect the Filament Drive Gear
-
Check Alignment: Make sure the drive gear is properly aligned and not slipping. The gear should engage the filament correctly to push it into the hotend.
-
Clean the Gear: If there is any debris or filament residue on the gear, clean it off.
9. Run a Test Load
-
Manually Feed Filament: Try manually feeding the filament into the extruder to see if it catches or if there is any resistance.
-
Observe Behavior: Pay attention to whether the filament feeds unevenly or if it jams at any point.
Often, issues with loading the filament into the AMS are a result of broken filament. Below is a guided list of how to address both the broken filament and any other potential issues with the AMS system itself.
1. Turn Off the Printer
-
Safety First: Before working on the printer, turn it off and unplug it to avoid any accidents or further damage.
2. Access the AMS
-
Locate the AMS: Open the AMS compartment to access the filament and internal mechanisms. The exact location and access method can vary depending on your printer model.
3. Remove the Broken Filament
-
Identify the Break: Determine where the filament is broken. It could be in the spool, in the AMS unit, or in the Bowden tube.
-
Gently Pull Out: Carefully pull out any broken filament pieces. You may need to disassemble some parts of the AMS or feeder system to fully remove the broken filament.
-
Cut if Necessary: Use a pair of scissors or a cutting tool to cut away any filament that is tangled or stuck.
4. Inspect and Clean the AMS Components
-
Check for Residue: Look for any remnants of filament or debris inside the AMS unit. Clean out any residue to ensure smooth operation.
-
Inspect the Feeder and Drive Mechanisms: Make sure that the feeder gears and drive mechanisms are not damaged or clogged. Clean or lubricate them if needed.
5. Check the Bowden Tube and Path
-
Inspect the Tube: If the broken filament was stuck in the Bowden tube, check for any obstructions. Remove and clean the tube if necessary.
-
Reinstall the Tube: If you removed the Bowden tube, make sure it is securely reconnected.
6. Load New Filament
-
Prepare the Filament: Ensure the new filament is properly wound on the spool and free of tangles.
-
Insert the Filament: Follow the manufacturer's instructions to load the new filament into the AMS. This often involves threading the filament through the feeder mechanism and into the extruder.
7. Test the System
-
Power On: Plug the printer back in and turn it on.
-
Run a Test Load: Use the printer’s control interface to run a filament load test. This will help you ensure that the filament is feeding correctly through the AMS and into the extruder.
8. Perform a Calibration Check
Bed and Nozzle Calibration: After resolving the filament issue, it’s a good idea to run a calibration check for the bed and nozzle to ensure everything is properly aligned and functioning.
9. Monitor for Issues
Watch for Problems: Keep an eye on the printer during the first few prints after fixing the filament issue to make sure that there are no further problems with the AMS or filament feed.
Sending Models to the Printer
If you're having trouble sending a 3D model to your 3D printer, there are several potential issues that could be causing the problem. Here’s a step-by-step troubleshooting guide to help you resolve the issue:
1. Check the File Format
-
Supported Formats: Ensure that the file you're trying to send is in a format supported by the Bambu Labs PS1. Common formats include .stl, .obj, or .3mf. Refer to the printer’s manual or software documentation for supported formats.
2. Verify the File Integrity
-
File Corruption: Ensure that the 3D model file is not corrupted. Try opening the file in a different 3D modeling or slicing software to check if it loads correctly.
-
File Size: Check if the file size is within the limits supported by the printer and slicing software.
3. Check the Slicing Software
-
Slicing Settings: Make sure the 3D model has been properly sliced. Use the recommended slicing software for the Bambu Labs PS1, such as Bambu Studio or another compatible slicer.
-
Export Settings: Verify that the export settings in your slicing software are correct for your printer. This includes selecting the correct printer profile and settings.
4. Ensure Proper Connection
-
Wired Connection: If you’re using a USB cable, ensure that the cable is properly connected to both the printer and your computer.
-
Wireless Connection: If you’re sending the file wirelessly, ensure that both the printer and your computer are connected to the same Wi-Fi network.
5. Update Firmware and Software
-
Printer Firmware: Check if there are any updates available for your printer’s firmware and apply them if necessary.
-
Slicing Software: Ensure that your slicing software is up-to-date.
6. Restart Devices
-
Power Cycle: Try restarting both your 3D printer and your computer to reset any temporary issues or glitches.
7. Check Printer’s Network Configuration
-
Wi-Fi Settings: Ensure that the printer is properly connected to your Wi-Fi network. Check the network settings on the printer’s interface.
-
IP Address: Make sure the printer has a valid IP address if you’re sending files over the network.
8. Examine the Transfer Method
-
USB Stick: If using a USB stick, ensure it’s formatted correctly and that the file is placed in the appropriate folder.
-
Direct Connection: If using a direct connection (e.g., through a USB cable), make sure the printer is recognized by your computer.
9. Verify Printer Status
-
Printer Ready: Ensure that the printer is powered on and in a ready state to receive files.
-
Check Logs: Some printers have a log or error message system that can provide clues if there’s a problem with receiving files.
By following these troubleshooting steps, you should be able to identify and resolve the issue preventing your 3D model from being sent to your Bambu Labs PS1 printer.
Connecting to the Printer
If you're having trouble connecting to your 3D printer, there are several potential issues you should check. Here's a comprehensive troubleshooting guide to help you resolve the connection problem:
1. Check the Power and Physical Connections
-
Power Supply: Ensure that the printer is properly plugged into a working power outlet and that it is turned on.
-
Cables: If you’re using a USB cable, make sure it is securely connected to both the printer and the computer. Check for any visible damage to the cable.
2. Verify Network Connection
-
Wi-Fi: Make sure the printer is connected to the correct Wi-Fi network. Check the Wi-Fi settings on the printer’s interface to ensure it is connected to your home network.
-
Network Stability: Ensure your Wi-Fi network is functioning properly and that other devices can connect to it without issues.
3. Check Printer’s IP Address
-
IP Address: Ensure that the printer has a valid IP address assigned by your router. You can typically find this information on the printer’s display screen or settings menu.
-
Ping Test: Try pinging the printer’s IP address from your computer to check if it responds. Open Command Prompt or Terminal and type ping [IP address] (replace [IP address] with the printer's actual IP).
4. Verify Software and Firmware
-
Update Firmware: Check if there’s a firmware update available for your Bambu Labs PS1 and apply it if necessary. Firmware updates can resolve many connectivity issues.
-
Update Software: Make sure your slicing software or any software used to connect to the printer is up-to-date.
5. Restart Devices
-
Power Cycle: Restart both your 3D printer and your computer or mobile device. This can resolve temporary glitches and connectivity issues.
-
Router Reboot: Consider rebooting your router to refresh the network connection.
6. Check Firewall and Security Settings
-
Firewall: Ensure that your computer’s firewall or antivirus software is not blocking the connection to the printer. You may need to configure your firewall to allow traffic to and from the printer.
-
Network Security: Verify that the network settings do not have restrictions that might be blocking communication with the printer.
7. Verify Printer’s Network Configuration
-
Network Settings: Check the network settings on the printer’s interface. Make sure the correct network settings are configured, and that it is not set to a different network or static IP that might be causing issues.
-
SSID and Password: Double-check the SSID (network name) and password to ensure they are correct.
8. Check for Interference
-
Signal Interference: Ensure there is no interference from other electronic devices that could be affecting the Wi-Fi signal. Devices like cordless phones or microwaves can sometimes cause interference.
By following these steps, you should be able to diagnose and resolve most connectivity issues with your 3D printer.